Thank you so much for the interest in the instructions to make the pop tab purse.

I also learnt that I don't know how to tie off the nylon thread. Every knot I made slips back out. So I burnt the end of the thread like someone suggested but how is that going to hold my stitch. It did keep the end of the thread from fraying. So........I thought I would melt the threads together to tie my stitch off........yep.......I melted the thread clean off and still didn't hold my stitch, lol..
I finally tied a knot and carefully melted the yarm to keep the knot in place.
 Big side of tab laying over each other
 Small side of tabs laying over each other
Use whatever look you like best or you will have a boo boo in your purse like I do. See the strip in my purse that I got the tabs going the wrong direction. I didn't change it at the time because I thought I would never finish the purse anyway and who cared but me, but I did finish and now have a mistake. I've made others after this and I still get them going the wrong direction. You just pull your work out and start again.


10. Put the two tabs together with right sides or smooth sides together, matching tab shapes. Insert hook into both tabs at the same time and crochet 2 SC.
You will always be facing tabs together to crochet and then opening up when you have a finished to see the results and start the next row.

On my first purse I used a nylon thread #18 that is used for macrame. It's very slick and hard to work with. It made a great purse but then I used black yarn and it looks the same it's just holds the stitch tighter.

I also learnt that I don't know how to tie off the nylon thread. Every knot I made slips back out. So I burnt the end of the thread like someone suggested but how is that going to hold my stitch. It did keep the end of the thread from fraying. So........I thought I would melt the threads together to tie my stitch off........yep.......I melted the thread clean off and still didn't hold my stitch, lol..
I finally tied a knot and carefully melted the yarm to keep the knot in place.
From what I've learnt, there is really no right or wrong. If you do a few stitches and it doesn't look or feel right, try something else.
There is also two different looks that you can achieve by the way you lay the tabs on each other. When you start the row you need to decide which look you want.
 Big side of tab laying over each other
 Small side of tabs laying over each other
Use whatever look you like best or you will have a boo boo in your purse like I do. See the strip in my purse that I got the tabs going the wrong direction. I didn't change it at the time because I thought I would never finish the purse anyway and who cared but me, but I did finish and now have a mistake. I've made others after this and I still get them going the wrong direction. You just pull your work out and start again.

1. Take your first two tabs, right sides together and tie your yarn into one of the holes.

2. Insert your hook through the center of the tab where you tied your yarn and draw up a loop. 

3. Make 2 Single crochet (SC) in same hole. Chain 1.
If you use the nylon, do not chain one after the two sc. The reason is.....The nylon is so loose you don't need that extra thread. If you use yarn your stitches will be to tight so you have to chain 1 after the 2 sc in a tab hole.
If you use the nylon, do not chain one after the two sc. The reason is.....The nylon is so loose you don't need that extra thread. If you use yarn your stitches will be to tight so you have to chain 1 after the 2 sc in a tab hole.
4. Open the two tabs up and decide what look you want, If you want to see the big part of the tabs when you are finished, lay the second tab on top of the first tab.

If you want the smaller part of the tab to show when you are finished, lay the second tab under the first.
5. Bring the tabs together, right sides facing each other. 2 sc in the next hole, chain 1. 

6. Open these pieces so you see what it's going to look like. Once you get the hang of it, you won't have to open each row to see how to add the next two tabs.

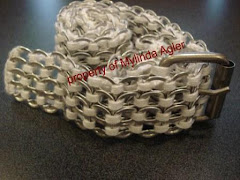
7. Continue adding tabs following step 5 until you have 13 in a row. My purse 13 tabs high measures about 6 inches high. This was a great size for a night out on the town as an evening bag but not a good "go to the grocery store, mommy size". If you want it to be taller, now is the time to add more tabs.
8. When you have your row as long as you want, 2 SC in the holes of the last two tabs.
9. chain 2, then open the first two row. Your work should be in the position like the photo to add the next row of tabs.


10. Put the two tabs together with right sides or smooth sides together, matching tab shapes. Insert hook into both tabs at the same time and crochet 2 SC.

You will always be facing tabs together to crochet and then opening up when you have a finished to see the results and start the next row.
11. Add your next tab on, continueing your pattern. For my row and pattern, the tab will be added on the outside of the tab. see photo

12. Put the tabs together and crochet 2 SC in tab holes.

13. Continue adding tabs to complete this row. When your get to the end of the row, chain 2, turn and add your next row in the same manner as you have been.
14. My purse was 30 rows wide.
15. Once you have added all your rows, which is how wide your purse will be, bring the beginning & the ending of the purse together, with right sides facing each other. Continue crocheting the two tabs together just like you've been crocheting. Only crochet about 5 tabs and then turn the bag right side out. You will now be working from the inside of the bag. Continue to crochet the rest of the way up the side of the bag. This takes a little patients as it's hard to work your hook on the inside of the bag in such a small place......Always remember, you will only be doing this once.
At this point you will have the body of the bag done.


10 comments:
Thanks you so much for this part of the tutorial, I started mine as soon as I saw it! Thank you again!!
Thanks for the great tutorial. I will try it if I have enough tabs :)
Oh I am so thrilled to find these instructions. I saw a pop tab purse at a museum this past week and knew I could make one if I could just find some starting instructions!
BEAUTIFUL!!! This is really great. I'll try to do this tomorrow. I like it and thank you for the giving tutorial...
AWESOME!!!!!!!!!!!!!!!!!!!!
Blessings on you 100-fold. Thank you for your generosity ... sharing these instructions instead of selling them or simply selling the bags yourself for a gazillion dollars each.
Thanks very much for your tutorial. I used it to help me create pop tab chain mail armor that I gave to my nephew for Christmas. He loved it.
What size needle did you use?
This is the greatest idea ever. But I give you major kudos for your patience, im only on like row 7 and im already cussing at it. But thanks so much for the pattern. LMAO
My size crochet hook that I use is "F"
Testing for comment section
Post a Comment